Do you know all the settings on Facebook? Do you know what traces you leave behind on Facebook?
Have you explored all the different ways to post, such as custom posting and grouping friends?
Privacy settings
Everyone should know these settings, have them adjusted for themselves and use them consciously: the privacy settings.
Here you should take a quick look before each post to see whether the setting is the way you want it. As a rule, the setting is set here as it was set in the previous item.
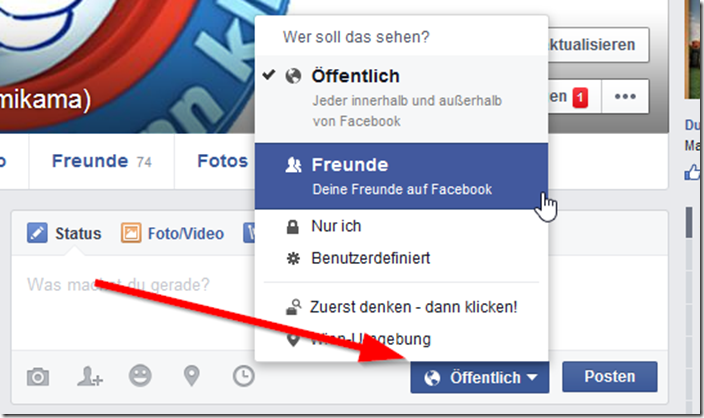
New users who log in to Facebook will find the “friends only” option in advance in their status post. With this default setting, Facebook wants to prevent a status post from being accidentally shared “Public”.
There are three simple settings:
- · Public
- · Friends
- · Just me
In the “only me” setting, no one but you can see the entry.
It's best to only choose public if you want to shout something to the world , if you want everyone to know it. Caution! By choosing this setting, you also give everyone within Facebook the right to share this post, comment on it and share it on their own wall.
“Friends” is the default setting, which we also recommend . This setting corresponds to the purpose of Facebook: the people you are friends with can read, comment on and share the post. Note: if one of your friends shares a post that only “friends” can see, then only the friends you are both friends with can still see this post, but not the people you are not friends with. However, to allow this, you must have the “Friends of tagged people” function activated. We're getting there now.
 Mimikama tip:
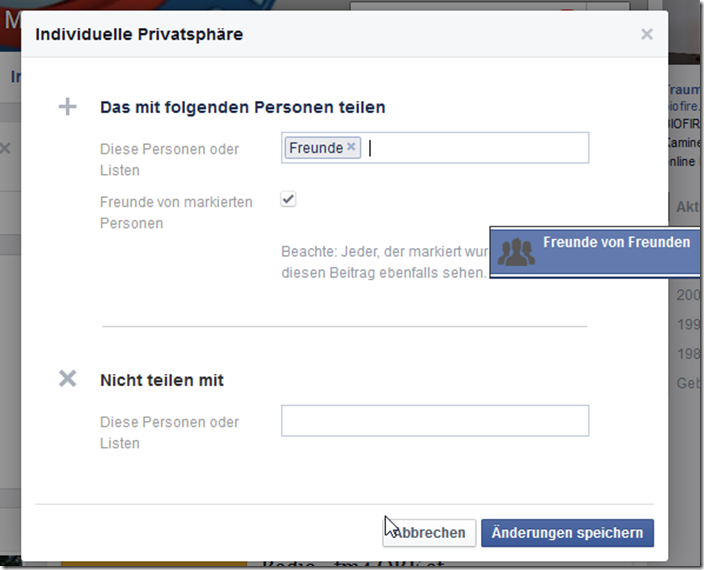
Try the “Custom” setting! Here you can set more precisely who is allowed to read this post. As a rule, the top field here says “Friends”, in which case the custom setting would not differ from the “Friends Only” setting.
However, you can now individualize by deleting the Friends entry and entering a list there instead.
To do this, however, you must first have sorted your friends into lists. This makes a lot of sense if you don't want certain people to see everything. Typical examples: superiors at work, in-laws or colleagues. So you build lists that don't contain certain people.
At the same time, lists also have the advantage: some messages only go specifically to certain people (soccer buddies, knitting club, etc.) so that you can post specifically here.
Lists: this is how it works!
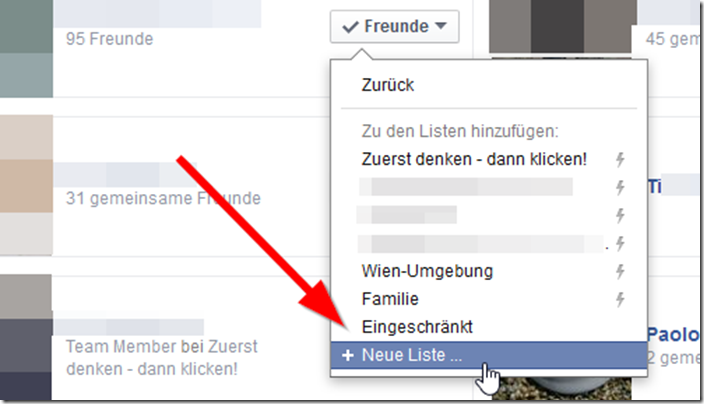
Open the overview of your friends in your profile. If you click on “Friends” here, a drop-down menu will appear where you can select “Add to another list”. It will look like that:
Facebook automatically creates a few lists, depending on your information, but you can use “New List” to create exactly one.
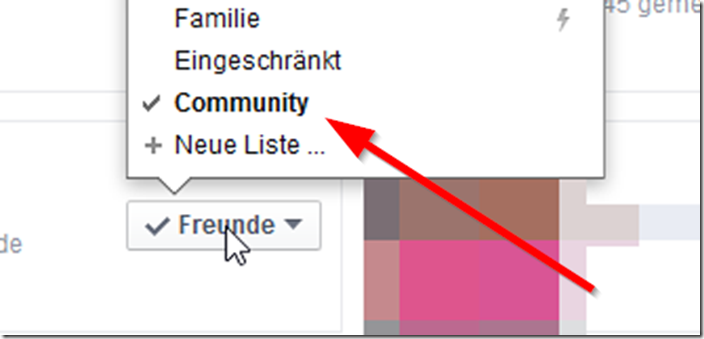
Don't worry, you can't "break" anything here. In our example case, we now create the “Community” list and confirm with ENTER. Now a new list has been created and this person has been added to this list at the same time. You can now add all friends who should appear on this list by selecting the respective friend, clicking on “Add to another list” and then selecting the newly created “Community” list.
Just try it! Note: Friends can appear on multiple lists, you are free to choose. And they generally remain on the “Friends” list.
Let's jump back again
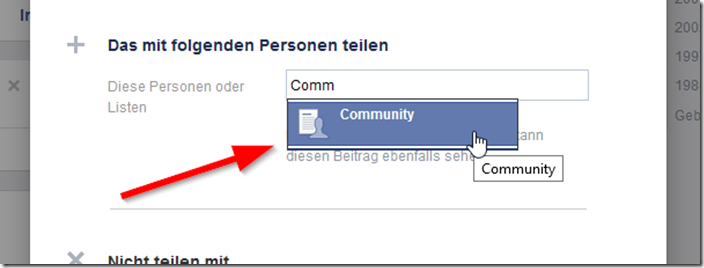
After you have built up your list(s), you can put them to good use. Select “Custom” in the privacy setting, remove the “Friends” default in the top field and instead write the name of the list(s) you created in the field. Since we created the “Community” list in the example, it looks like this:
If you now post this post, only the people who are in the list will see the post, no one else. Only these people can reply or like it.
Notes: The next time you post, this setting will still be selected, so if you want a different privacy setting, you will have to adjust it again.
The “Boss Button”
Many people know the dilemma: you get a friend request from a person you don't necessarily want to be friends with, but you can't really refuse either. These can be superiors, the boss or even club or association members with whom you should perhaps be better friends for the sake of peace.
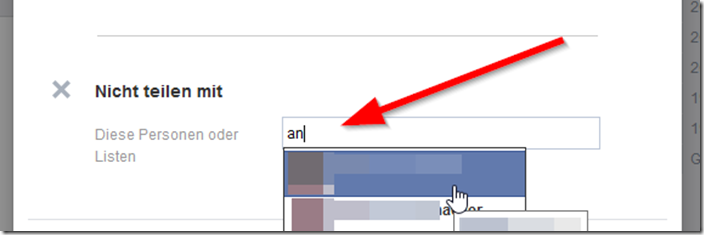
No problem! At this point, Facebook is exceptionally very accommodating and helpful. Here too you can select the user-defined settings and simply enter the person with whom you are “diplomatically” friends in the “do not share with” field.
The way to deal with this is that these person(s) can see this post.
Note: However, you should not have this activated permanently, because at some point this “lockout” could become too obvious for the people concerned.
Just try
You can't go wrong when building lists; friends won't disappear or you won't be able to screw up any settings. It's best to add this person to a corresponding list as soon as you get a new friend.
Preview image source: Gil C / Shutterstock.com
Notes:
1) This content reflects the current state of affairs at the time of publication. The reproduction of individual images, screenshots, embeds or video sequences serves to discuss the topic. 2) Individual contributions were created through the use of machine assistance and were carefully checked by the Mimikama editorial team before publication. ( Reason )


